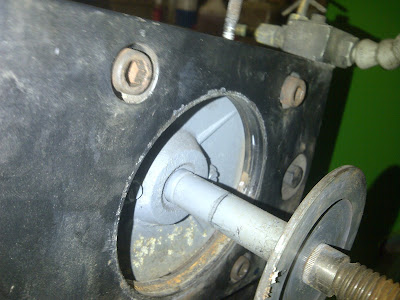
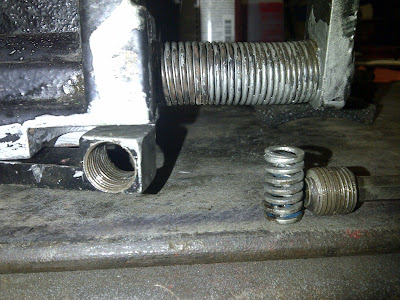
Here are a few pic's of the foley 660 . Not to bad of a job to tear apart and clean up .
To remove the sliding plate and entire grinder motor etc . , turn in feed wheel in to move plate towards back of grinder to expose the front roller bolt .

To remove you need to hold the underside with a 3/4 wrench and use a 1/2 socket and ratchet and remove the nyloc nut on top .

The front roller bolt is cambered so turning the bolt moves the rollers closer or farther away from the slide rails for adjustments when it come to assemble time .

To remove you need to hold the underside with a 3/4 wrench and use a 1/2 socket and ratchet and remove the nyloc nut on top .

The front roller bolt is cambered so turning the bolt moves the rollers closer or farther away from the slide rails for adjustments when it come to assemble time .
After removing the cutting unit scrape and clean bottom and repaint if needed .
If you use the bottom for the coolant you will have to silicon the weld seams . I used a Tremclad rust paint . It does a great job . Check the rails for wear . If they are wearing you can remove the spacer in the middle between them and set screws on each end ( top side) Mark the tubes on the ends with a straight line about center . You can use a large hammer and punch ( old socket ) and push them out on one end. Look at the lines on the end and rotate tubes 1/4 turn and re- install .
Re-install the spacer in the middle . To adjust the spacing between the rails use large calipers to get the same measurements on the ends as the center . I used a furniture clamp for a caliper . Works very well .
To remove the stone turn the guard upside down to access the area for removal .
Not positive but pretty sure it is on counter clock wise .
The spanners to remove the stone I don't have here . I use a crows foot 3/4 and ground the nubs on the end off . Works good . When installing the stone it doesn't have to be tighten on really tight . The cup stone is almost new . If the inside wears down to about a half inch it will be time to replace the stone .
The Gaurd can slide off next . The set screw will have to be backed off .
The motor can be removed after taking the 4 large Allen head bolts out .
To remove the sliding plate and infeed wheel I use one of these ball headed allen keys .
This way I do not have to remove the wheel to get it off . ( 2 bolts )
On the right side of the plate there is a spring loaded set screw . Remove this and take spring ( behind set screw )out for assembly later . When re assembling turn set screw all the way in till it just bottoms out on spring then turn out 1/2 turn .
Now the slide plate has three roller guides to keep it on the bottom plate.
Pick of the slide plate rollers ( 3 ) check for play and replace as needed also check plate for wear .
Here is a pick re - assembled . The sweeper pads should be replaced every 6 months . Being a seasonal course I change mine yearly.

The large rollers that ride the rails have 2 bearings in each one ( 6 ) check them for wear . I found it easier to install the bottom plate with nothing attached to it first . It takes a little bit of effort to install the single roller and hold it in place snugging it on the rails . Then you can reach on the underside with a 3/4 wrench and move the camber bolt to make the finale adjustments . You should be able to grasp the opposite corners of plate and twist and not feel any play . Adjust till play is out and tighten 1/2" nylock on top . Be sure to keep wrench on bottom side or it will unadjust on you .

The large rollers that ride the rails have 2 bearings in each one ( 6 ) check them for wear . I found it easier to install the bottom plate with nothing attached to it first . It takes a little bit of effort to install the single roller and hold it in place snugging it on the rails . Then you can reach on the underside with a 3/4 wrench and move the camber bolt to make the finale adjustments . You should be able to grasp the opposite corners of plate and twist and not feel any play . Adjust till play is out and tighten 1/2" nylock on top . Be sure to keep wrench on bottom side or it will unadjust on you .
Scraped the pump off too and repainted . I do not use the bottom of grinder to hold coolant . The drain plug was removed on mine and I installed a hose into a container . My pump is suspended in a container . This way the tray is only wet when the grinder is working .
A pick of the little t handle I braze on . The gaurd is in place .
Mine stays in this position most of the time. The guard scrapes on the ends of bed-knife frames of the jac units if I don't.
Disassemble all this area when you have it on the bench and reassemble with never seize ( adjustment for grinding head up and down ) . Also do the same for the stone facer shaft ( it does tend to seize up easily ) . Check that the diamond tip is still there .
Any place that has an Allan set screw over threads also has a nylon ball under it to help keep tension on the threads so the adjustment doesn't back off while grinding .
It will be a few months before I start using it again so It will be coverd till then and don't fill the coolant till you need it .


No comments:
Post a Comment