Wednesday, February 29, 2012

Wheel bearing replacement 1250 Toro sprayer

 The  front wheel bearings felt a little loose so I removed them for cleaning and repacking /or replacement . I like to leave the lug nuts on in case The treads get damaged . After cleaning the bearings they where noticeably worn out .
 When you replace the bearing also replace the race . If you don't do this than the new bearing may not last long depending on how damaged/worn the race is . They drive out pretty easy , I use a punch and hammer and light taps 180 degrees apart from side to side till it comes out .

 Drive in the new races.
 Make sure they bottom out in the bore .

 I'm packing the new bearings with a good wheel bearing grease, I use the side you see above and pick it of on the heel of my hand working around the bearing till I see it come up on the opposite end . They do sell a bearing packing tool but I've always have done it this way .
 New dust seal to tap in place . Then place it back on the spindle and pack the other bearing .
 The channel locks I find the easiest to use . Turn the nut in till it just starts to draw it in . As your snugging up the nut rotate the hub both ways a few turns . It's a very light setting to set the bearing ( inch lbs ). For the guys that do this everyday you get a good feel for it . In the auto industry you get a specific inch lbs. setting to go by to set the bearing .If you have the service manual for your machine it maybe in there also . But depending on the type of grease and how cold it is in the shop it may not be accurate .  Now you can back the nut off and lightly bring it to the nearest notch in the castle nut . To give you an idea you should be able to almost remove a nut with your fingers when taking them off .
 Most important part is to replace to cotter pin with a NEW one .
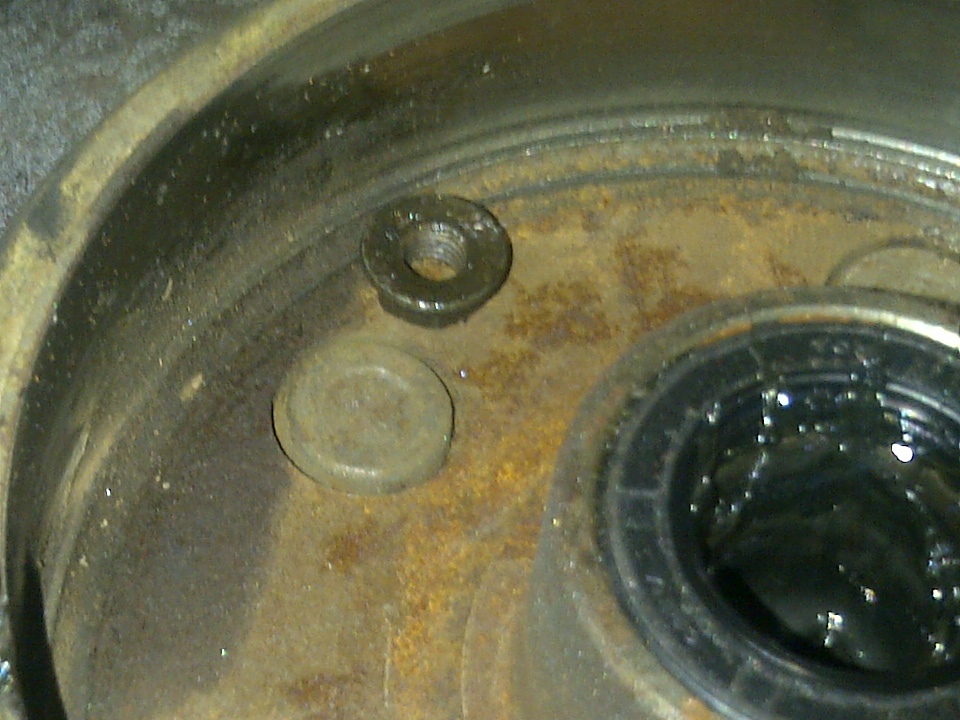
 The other front hub had a rattle and when I removed it found this nut .
The backing plate bolts had loosen off and one bolt actually fell out . I have some fine thread bolts in stock to replace them .
When the warm weather hits you can recheck the bearings at the next service interval for adjustment if needed .

Tuesday, February 28, 2012

1250 Toro Sprayer parts in .

 Ball joints came in on Monday . I ordered ball joints , ball joints is what I received as per ordered . I am saying this because in the auto industry you get ball joint , rubber boot , nut ,washer and cotter pin (as a complete set ). So when ordering look for other part #'s to complete the job . I was lucky that I had not thrown the old parts I needed away.I used a 3/4 "drive 1.5" socket to drive them in. they went in fairly easy .
 Once I'm done servicing the rest of the machine I'll check the toe-in .
On the lower A frame control arms I drilled and tapped for grease nipples (4 of them ) a few years ago . Since doing this I haven't  replaced any of the plastic bushings .
------------------------------------------------------------
Finished servicing / cleaning both  foley grinders for next season . Just have to paint the bottom of bedknive grinder.

Friday, February 24, 2012

2001 Toro 1250 sprayer loose steering

 When I'm servicing this machine for winter maintenance I remove the  seat and body for easy access . unscrew the 2 panels and drop through body and remove shifting ball and lock nut . The shifting boot can stay on the body . Now back to the loose steering . I noticed when replacing a flat tire recently that the side wear on it was pretty extreme for only being 1 season old . There is a fair amount of play on the front wheel moving it left to right . At first it looked like a bad bushing that would have involved removing the engine . After looking a little closer I saw the ball joint on the hydraulic steering ram had some play . To get at this ram you have to unbolt and pull forward the panel with all the relays and fuses attached to it . First remove the battery cables , lots of electronics to short out easily .


 Here it is directly in front of the motor .(above pic ) If you look straight down by the grease nipple is the bushing I was talking about earlier .
 To get access to the nut I pulled up on electrical panel and used mechanics wire up to the steering wheel to hold out of the way . It looks like a tight spot and it is . I had to use a scratch awl and a bent flat screw driver and a pair of needle nose pliers to get the cotter pin out . 
 The nut was just loose . After I tightened it back up I checked for play in the steering . Most of it was gone but 3 of the 4 ball joints on the steering knuckles where worn out . 
 Ordered the parts for repair . My parts where in stock and are in next day usually . Now I'm getting the front end ready for the new parts when they arrive .Remove all the cotter pins .
 Remove the lower ball joint nut and back the upper to almost off same for the outer tie rod ends .
 A couple of good smacks with a heavy hammer here will loosen the joint off . The nut was left on to prevent the steering knuckle and lower control arm from swinging down towards the floor possibly taking the brake line with it . I think it's a torsion type suspension so there is little to NO spring pressure with the suspension hanging down . SAFETY TIP :When working on front suspensions understand if it is spring loaded or not . Read the service manual . You can prevent damage to the machine but most importantly yourself . If there was a large spring between or above the control arm than you would need support or a jack under the lower control arm to lower it slowly after the upper ball joint lets go . I have heard of near fatal injuries from this type of work on different equipment .
 Now I'm taking my larger ball peen hammer and hitting it in this location to loosen them off . The nut is left on in case you miss swing and hit the threads .
 I'll use the ball joint fork on the lower control arm .


 Clean this area up good to expose the clips holding the ball joints in .
 Remove the clips and soak down with a good penetrating fluid . Walk away and grab a coffee .
 I'm using an impact socket just a little smaller than the top of the ball joint . Use some mechanics wire and wire up steering knuckle to keep it from falling to the ground . ( we only have so many hands  )  I have an old impact extension to hit with a hammer to knock it out off the upper control arm .


 Do the same for the lower . Mine are the original ones and came out OK . 
My parts didn't show up in time so I placed jacks in place on lift arms to frame to help support the tripod jack . It's going to be in limbo for the week end .
On this model can you see where the cables attach well just below that you can see a bolt with a washer under it . Every winter I replace the nylon nut on the other side . It loosen off because staff forget that you have to put the key on/running and press down on the brake to get the shifting lever to work . When this bolt loosens off it causes all kinds of issues which go away after tightening it back up . If it loosen off in mid season or while spraying it can be a big job to fix with everything else going on .
 
Yes you might notice my battery is in a different location . The old location made it almost impossible or time consuming to jump start .


Wednesday, February 22, 2012

TX Gator Delay

 Last Friday I drove the TX off the lift and left it in the shop to dry up the floor pan that was painted . On Monday I went to pull it out to store away and no go . After checking a few things (electrical connections )I found that the starter solenoid ( step and go )was bad and ordered a new one . After installing it today The machine would turn over but not start now . Now this machine had no issues before I started servicing it . So I back tracked all the work done and double checked everything . I even went so far as checking the valve adjustment again .
Half way through the tear down process to check the valves I noticed the governor cable ( spring one below the shifting cable ) had fallen off . I knew I solved it now but checked the valve adjustment again anyway . Just goes to show you that you can do everything right and something like this can add a few hours to your day . 

Started to clean up the bed knife grinder while I'm waiting for the pro-gator to be sent out for leaf spring work on all four corners . I looked around at parts and I'm in an area that has a shop that specializes in suspensions and  can do it a little cheaper freeing up my time . Our old Toro1250 sprayer next . Front end needs some work it's wearing out the smooth tires to quick. Might be an early spring and more gear to go over yet . I'm predicting 2-3 weeks early start up unless the rest of February goes bad .

Wednesday, February 15, 2012

TX JD Gator valve adjustment

 The manual says every 300 hrs. This one has 635 hrs. Manual says to remove rocker cover etc.... The rocker cover can't be removed without removing the extra bracing for the rear end on this machine .
Clean the area around plug and rocker cover before removing them .

In the lower pick I'm finding top dead center with a piece off copper tubing ( a piece of wooden dowel is best ) Keep it centered on the piston and rotate clutch till the intake valve ( the one on the carburetor side )stops in the closed position (up). This is the TDC on the compression/firing stroke .
Check gap with a feeler gauge (.004 to .006 ")
My intake valve was with in spec .
The exhaust was a little of . Use an Allan key to loosen set screw in center of adjusting nut .
Adjust and tighten set screw and recheck gap . Below is the fuse block under the hood . If for some reason the electric dump bed does not move check the 40 amp fuse (orange)it's probably corroded . I have a zip tie around them .

Saturday, February 11, 2012

Vinyl Guard


Renew, protect and maintain golf course equipment with VinylGuard.

  My last superintendent wanted to find a product to cover our flag sticks (pins) at the golf course . He did some preliminary searches and found other products that where not economically a good choice . I was asked to look around and see if I could find a cheaper product . After much searching I had found this site ( before the golf division was started ) .
 To go back in time , we use to take 2 to 3 weeks at each course to sand down the flag poles and bunker rakes then spray paint a few coats of paint /lacquer on . It was a very time consuming process and the paint fumes would get unbearable inside (winter work).
 Since we found this product we can recover all the bunker rakes and pins at both course in little time for less than it would cost for paint / wages and lost time that could have been used for other golf course business .
 Every off season we wash and inspect the vinyl guard and replace as needed . It's very cost effective and the Vinyl Guard company is very easy to deal with .
 I have heard of techs using this product on hammer handles and adjustable wrenches . I'm looking around an see a few more uses for it . Would be great to cover the ball washer poles and our square shaped markers we use to direct traffic on the course .
   Both course have been using the vinyl guard products for 4 ++ seasons and are extremely happy . It really spruces up the course . There are a wide range of colors . We use two colors on our pins yellow on top and black on the bottom .We put the yellow on first then just over lap the black . Looks as good or better than the factory finish . In the second pick the factory one is on the right . The yellow was over lapped on the black on the left one . Should have been the other way around for a cleaner look . Some electrical tape will give it a great look .

Saturday, February 4, 2012

JD Gator 4x2 debris build up under seats .

 We have 2 of these units here (2004-5). I noticed the floor pan was getting weak by the frame.
 Every year I pull the seats and cover off to clean around battery etc .  It was a little more work to pull the tank .
 This year I removed the gas tank and found a lot of debris under and around it .
 The tank has only one bolt holding it in and I'm thinking by drilling a bigger drain hole in the bottom I might be able to lift on the fill neck of the gas tank and flush around  that area with the wash rack hose .
Welded in a patch to support this area . I'm going to paint on some rubberized coating on the inside before replacing the tank . Over all not a bad machine they tend to burn more oil then my other maintenance carts but have been pretty dependable .