Friday, May 27, 2016

JD 7400 tier 4 engine issue

A few days ago, one of our best operators (Danny) came in and mention that it stopped mowing and wouldn't pick up any speed. He had it out for a few hours prior. With all the sensors on it and so few hours...Nick (traveling tech) for Reddin Equipment came by to check out the issue. Hooking his laptop to the machine and checked settings etc. determined it was a bad DOC outlet temp sensor.
 We have a lot of rough area to mow and need every unit out and mowing as much as possible just to keep up.
Down time is not an option. The part was located and air shipped next day. PERFECT.


Sorry about quality of pictures but when I see parts to put on I'm on the move even if it's 4:15 am.Sensor on the right was gone. Actually, could wiggle it around. New one in.
Old one out.

Nothing makes a mechanic happier than a quick turn around with a much-needed machine.
Thanks, Harold Larter, for making it happen and Nick for finding the problem.


Ben is out with it now. Great guys here at Brunello. They are good on the gear.


Thursday, May 26, 2016

JD 7500 verticutter front roller scrapers

We have the wire that cleans of the rear roller .The issue is the verticutters throw the clippings forward for the front roller to pick up . It will increase the front roller dimension by a good 1/2 ".After looking in the parts book I didn't see clearly if there are front scrapers available . Being in a new shop there is some left over building materials.  I happened to save a bunch of 5/16th threaded rod .


Perfect and the price was right . The front rollers are set for the +  -HOC that we use and most likely will never change . As you can see in above picture there is a space just big enough to get the threaded rod in the front roller arms . 


Fairly simple to do only took 45 min.to do a 5 set installed .


Thread the nuts on a fair way ,more so on one end to slide in place with a backer washers . Then washer lock washer and nut on the outer end . Tighten the inside nuts till their just touching the washer and roller arm . As the outside ones are tighten it will draw the threaded rod tight . 


Cut excess off . Turned out great and pretty easy to do . Now the clippings will get trapped on rod and wipe roller . Excess clippings will drop off the back . 


Saturday, May 21, 2016

Torque Multiplier

I've been looking around for a tool to torque the rear tractor wheels on the 5055E .Specs  say 405 ft lbs.I did get a few quotes for tool ranging anywhere between 700 to 1000$.A bit pricey for a tool that would rarely be used . Princess Auto had one for $119 on sale a while back and rated for up to 720 ft lbs. torque ratio is 1 to 3.3 . 


Needed a piece a fence pipe to anchor one end . Setting the torque wrench to 122 FT lbs made quick and easy work of it . Good thing I checked after it came back from warranty work the right side wasn't quite torqued enough . That's normal they should be check when removed after the first use . Also used it to replace some worn out pins on the box scrapper .

Sunday, May 15, 2016

The Links at Brunello May 2016

A few picks of the course . With a great winter season most course are looking good . A blessing after the previous harsh winter . Every ones of to a good start . 
Have a great summer.
Things are ramping up !!!


Must play course .Looks like July out there !!


Rotary Lift traction fix

Love my Turf equipment Lift , the only issue is the factory traction paint doesn't last long . Especially when adjustments are done to most machines after they come in off the wash rack . 


You can see the paint gone from spinning tire to get on and off the lift .


Started by sanding the paint down to bare metal. 


with the MIG it was easy to run raised beads on wheel buckets 


Just the leading one needed to be done 


Finished took 5 minutes 


So easy to get our JD 2500E on the lift ...even with the smooth tires .
Effortless !!!

This was another great indirect Twitter post find . I noticed some had done it to their lift in one of the pictures . 

Great idea . 
Once a year they may need re-beading as they smooth out or wear . 


More rack builds


New shops require lots of racking to make permanent homes for equipment . Most the the racks I'm making can be moved if needed .


We have commercial racks left over .I was able to cut down and weld them to fit 6 
Hover mowers 


Weld screens on for extra strength 


Turned out really well and gets them off the ground . 
One more prodject to clean up another area when time allows . Maybe a winter project . Things a ramping up . 


Thursday, April 14, 2016

More Fabrication Jobs ( Racks for landscaping tools )

  
Having a new shop keeps a guy busy . It's almost go time and the guys and machines are raring to go . Had some time this week to make racks to clean up the landscaping tool area . 


Our irrigation expert (Rob ) started the project last season but ran out of time . Great design on the holder bars which I reused to strengthen things up a bit . 


Making a second rack to hold the speciality items 


In the process of trying to get it right the first time . 


Added a few extra pieces to make them take up less space . 


 One of the landscaping rakes had a long reach handle . Added a few more bars to get it on . 


Organized easy access .  24 ' of racking .


The forward legs are reinforced . I can actually grab any 2 bars  pull myself up without any tipping hazards .

Fertilizer spreader carrier (double wide)


Had some building material left over from building racks for course tools (shovels etc . ) I left it up to our Assistant Superintendent (Joel Amirault) the choice was 2 more single hitches or a double wide one. 
Double wide was my new fabricating challenge. 


Actually, went very well and was an easy build. Materials are the same as my single ones. 1.5" square tube stock 1/8 " thick and 1.5" angle.  


Best way is to use 2 spreader and build around them, making sure wheels sit down in the frame to axle hits on angle iron. 


Running one piece of tube stock down at the middle for the hitch point. These 2 in the rear are for the frame to sit on.  


Built a ledge and then a catch. All you have to do is lift the front and pull out .... easy


slide some spacers under to weld brackets in place . 


Mocking up the distance to the back of the cart. 


Turned out well looks great.


The hitch point is a solid 1.25" square stock for strength. 


Heating the tube stock red hot, it was easy to just jack up an get a bit more angle to compensate for a good 100 lbs of fertilizer. After it cooled I tac welded on the sides to remove. 


 Adding the rebar here will prevent it from sagging. Worked great on the fairway dew drag. I can bounce up and down on the rear with no problems. 

Primer and paint. Great little project. Mig welders make fabrication a breeze.


Friday, April 8, 2016

PTO Measuring

Almost go time .
 I had a little time left to figure out a problem and repair it now so next winter season it's ready to go . 
Recently I rebuilt one end of the PTO shaft on our tractor mounted snow blower . The tractor end was almost impossible to remove and needed a closer look to see why . 


I spent a few hours before managing  to get the other end off.
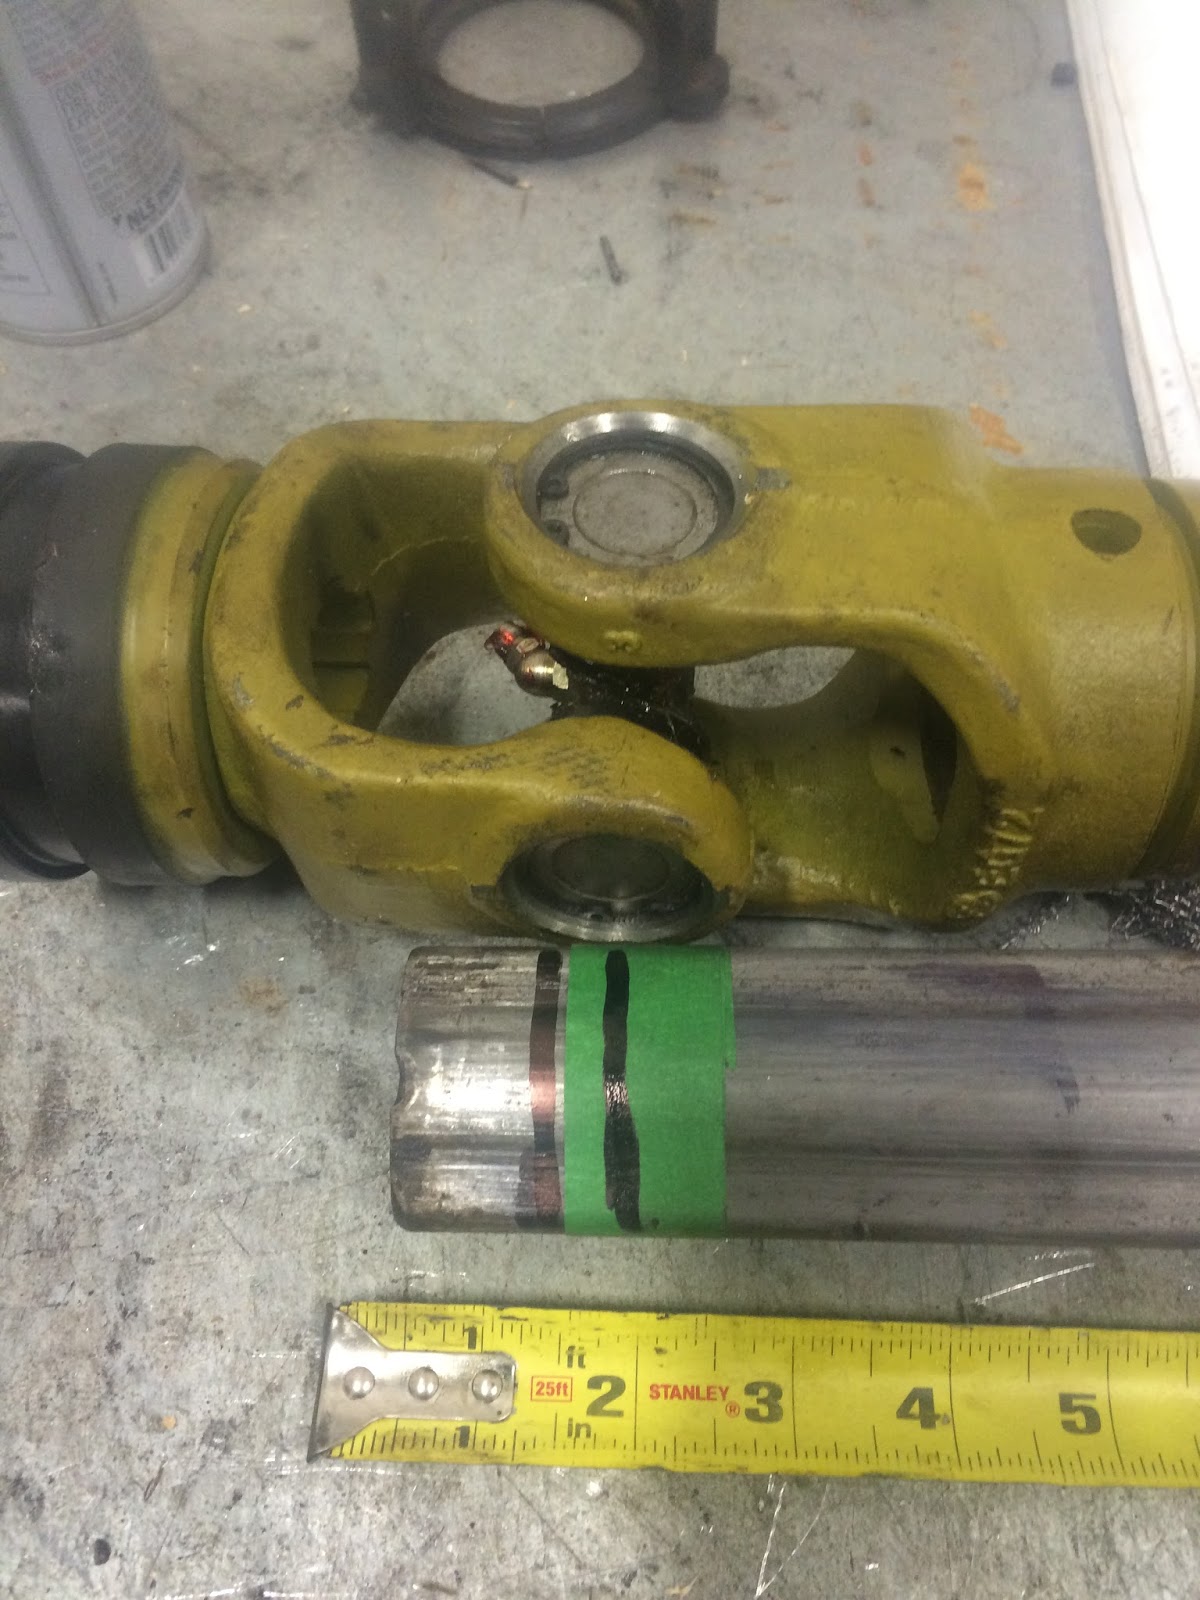
 Most of the time PTO shafts will fit with no issues but you never know if it was the right one delivered and should be checked to be 100% sure the first time out .  What has happen is the shaft was to long and drove/bent bolts over the splines . The groove you see mid shaft is were the bolts lock it in place . 
Took a lot of heat /air hammering etc . to get it off the shaft . I'll be replacing the gear box seal you see in the picture in case it was damaged in the removal process. 
 

Newly rebuilt end . Ruined the catch/locking end on tractor side from being just a little to long . . 


The above pictures show that I'm at the exact minimal measurement . This is why the Male side of PTO shaft had a grove in it from hitting the roll pin on the the other end . 


Before measure to cut PTO shaft , you have to measure from the ends of splined shafts . Take one measurement with implement on the ground and one in transport position .  Some tractor implements have a lot of travel range . For example The Kubota 5040 and Lastic mower on a hilly course has a much larger travel range . Some other things that affect this measurement are : Is it being pulled or backed up when being used ? Top link setting on tractor ,the lower it is on tractor the higher it will lift off the ground = longer travel on PTO shaft . If the work involves backing up while in use then worn bushings etc. may come into play and the PTO shaft may bottom out causing damage to PTO shaft or worse yet drive it into the tractor case or gear box on implement . 

I used the longest setting (transport ) and moved half shafts in 4.5 " to cut off where they line up with the union . 

Their are charts to help you figure out if you need to cut the PTO drive line .Most golf equipment has the cat.1 - 3 point hitch. When you start getting  over 50 hp tractor it may have the cat. 2.  

Longest end of spline shaft measurement was 29"
now slide one of the 2 shafts back 4.5" .Then mark of the union where it needs to be cut.  You can see top left the size of the steel collar to keep the shaft from splitting . Lots of torque moving snow . 


Same at the other end . You can see the notch on this shaft where it was bottoming out  . This one was about 1.75" to long .

Set in vise enough to hold it and cut it of square on the lines . 


Safety shields will need a trim too . 
When reassembling the shafts use a fair amount of grease so the will slide easily . I have seen them wear through in a few seasons . Should be greased often along with unions . 

If you want to check PTO with implement off machine you can use a straight edge and measure from 3 point hitch (lower  pins ) to end of splines on tractor and attachment and add both together . Check it in travel to make sure its good after its hooked up .