Thursday, August 30, 2012

Summers winding down


Most of our students are leaving this week and next . We will be down to 6 or 7 staff to finish the season out . The grass is starting to slow down with the cooler evening temperatures . We will be on the move hopping from one machine to the other to get the cuts done on the course . This is the time of the year that I get my Minni break ( 4 day long week-end ) Everything is running good and all cuts are set up . So the crew is good to go and I feel quit confident that their shouldn't be any issues .
 This year I'm starting my break with a special treat . During the summer I participate in raising money for the cobequid service center .

http://www.cobequidfoundation.ca/?q=node/62


A Grand Day for Cobequid

3rd Annual Grand Day for Cobequid Raised over $75,000

On behalf of the Grand Day Steering Committee, we would like to thank all the participants, sponsors, partners and volunteers for helping make the 3rd Annual Grand Day for Cobequid a success! This event would not be possible without your support.
We have come a long way from the dream that Peter Korecki had while sitting on the end of his dock 4 years ago.
Together with our volunteers, sponsors, participants and partners we raised $75,325.
This will help improve patient care here at Cobequid and will go far towards funding our Steris Reliance Endoscope Reprocessing System.
For more information on Grand Day 2013 contact Ondra ondra.maclean@cdha.nshealth.ca or call 869-6128.


 12 k  kayak run on Grand Lake . It's a pretty good time and I happen to win these guys below . Off to a good start . Then we go to a 3 day holiday on the beach listening to the surf and enjoying the fresh air   . Totally relaxing after a busy summer keeping things sharp and running . My boys and their family are welcome to join us every year if they like . We're going to have the 2 grandkids here this year . Should be a great time .
  Not cheap but highly recommend it .
 http://www.quarterdeck.ns.ca/index.htm


Are you ready to spoil yourself? Then welcome! The Quarterdeck Beachside Villas & Grill.
Imagine strolling along a mile-long white sand beach, the sky pure blue, the ocean gently lapping the shoreline, in rhythm to your heart. Imagine relaxing in a luxurious Villa that nests right on the beach, moments after a refreshing jacuzzi. Stars twinkle in the calming, coastal night sky. Imagine feasting on the freshest Nova Scotia seafood while sipping fine Chardonnay followed by an authentic Nova Scotia blueberry cobbler. You're miles from the ordinary. You're a guest at The Quarterdeck Beachside Villas & Grill on Spectacular Summerville Beach. And you're ready to be spoiled! Canada Select

© The Quarterdeck Beachside Villas on Summerville Beach 2006

AccommodationsRestaurantAmenitiesReservationsLocationArea InterestsGetaway SpecialsGift CertificatesGift CertificatesContact Us
 Gives me a little boost to get through the fall .
   Next up aerating , deep tining , top dressing , aerovating fairways and then tarping greens . All in the next few months . Just have to get through September first .


Wednesday, August 29, 2012

Cushman front frame repair ( upper control arm )

 The gardeners cushman I noticed when it was going by that the front wheel on one side was back further than the other and when he backed up it would straighten up again . After closer inspection I found the frame had crack and a few pieces where missing . I had to heat it red hot and use a bar to beat it straight to line the cracks back up for welding . This is an older machine and the front frame retails for around $2,000 so this repair is the only option . Remove tie rod off spindle . Remove the shock strut . The bolts may be seized to the rubber bushings you will have to work the bolts back and forth with lots of penetrating fluid . You can remove the upper control arm to frame bolts . I didn't find any need to remove ball joint nuts off spindle . I was able to move it to the side altogether for the repair .
 Disconnect battery before welding .
 After welding up the cracks I made up another plate ( same thickness)and drilled the hole out for the upper control arm mounting bolts and welded it in over the bad area . Install bolts and washers to hold plate in place then weld in place .
 Remove the bolts and washers and reassemble . Replace any shims that came out , you may have to remove a few shims to align it up better .
 Reassemble parts and replace any cotter pins with new ones .
 
Turned out ok , I may still have to remove 1 more shim . A few years back we did the same repair to the other side . I find cushmans tend to rust quickly around here so it may be wise to get some rust check spray cans and spray the frames down in the off season .Our new one is rust checked every winter and so far so good . When you see patterns of wear or conditions that can  wear out a machine prematurely try to figure out if there is  anything that can be done to  slow down the process .  This is a great hauler if you keep an eye on the frame you will get many years of trouble free service out of them .
PS. A lot of repairs at our ( golf course ) level  may be reflected by budgets / age of machinery / skill level and resources . At a dealership they would most likely suggest replacing the frame . In this case it's not so much the budget but the age of the machine versus it's worth/overall condition and the cost of the part . If I though buying the new frame would get me 5 more working years out of the machine it may be worth the expense . But in this case it is not .


Friday, August 10, 2012

Club Car front leaf replacement

 One of the guys brought it to my attention that the Club Car he was driving suddenly bottomed out on one side . He was a little concerned that it was his fault . I told him that it was an old machine and it was just wear and tear and it is an easy repair and I also thanked him for telling me . This is the way it should be . Reporting machine problems right away so they can be dealt with . Some times damages are caused from horseplay and sometimes it's from normal wear and tear . If it's horseplay  mention it to the super so he is aware of a problem .
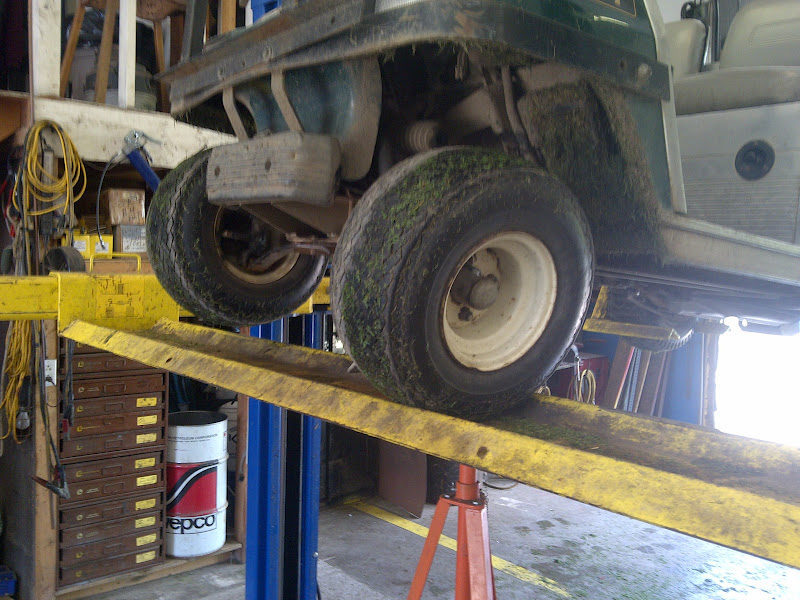
 It drove on to the lift with no problem . I put it on this way so I could put a bar across the frame supported by a jack stand . The reason for this is if something dropped it would still land on the tray . Nice clean break . Do not weld back together . They are fairly cheap to replace .

Placed the jack stand at a comfortable working height and then dropped the lift 1 notch .


Not to much to changing one out . Pull the wheels and then take the leaf spring bolts out . Remove the 4 bolts in the center plate to drop the remaining leaf spring parts .

 I reassembled in reverse order . There is an eccentric bolt for spring adjustment so that the tires will sit straight up and down . I couldn't get the bolt off and wound up snapping it . I have to eye ball it till the part comes in . I did put a bolt in it's place temporarily .
Raise the lift after your done to get it off the jack stand . Looks pretty good . I took it for a drive afterwards and I always do some figure eights to see how it feels . I just have the 4x2 gator laid up waiting for parts . Repair time less than 30 minutes . Even if everything was seized and you have a bolt bin then you could cut any troublesome bolts off with a torch . 


Thursday, August 9, 2012

Mid season oil changes

It's that time again . Just finished a little heat wave . Thanks for the rain I asked for . We were getting pretty burnt up but now starting to get green again . ( limited water supply ) My large area mowers  are soon going to be due for their second oil change of the season . I'm now going over the carts one by one till I can get through the maintenance fleet . Basically doing oil changes and cleaning batteries and topping them up . With this hot weather I have noticed a few batteries were getting to the add mark . I'll also will be checking brakes and for leaks and greasing front ends . Primary clutches will be blown out and secondary will get another blast of dry graphite grease on the buttons .It's really good to go over the fleet in mid season to find potential problems . So far 2 of our carts are out of service till the parts come in ( usually next day ) I found most of the starter/gen belts for the step and goes needed adjustments . One of the 4x2 gators has an axle to rear end leak and the bolts where loose plus one was snapped off , the same machine is missing the bolt that holds the secondary clutch to the shaft . One of the Turf II has a broke front leaf spring. The maintenance carts are hard to get to at times because they are always on the move I'll service each one and run out and trade for another one to be serviced till I get through the fleet .  Making the time now to get them back up to par will save you some grief . More tournaments coming up soon and once September rolls in will be on the home stretch for winter maintenance again . Seems like the older we get the faster the seasons fly by . Hard to believe another season will soon be behind us . Good luck with the remainder of the season . Hope you enjoyed the site . I'll be posting not as often now but will still highlight some aspects of the job .

Monday, July 23, 2012

Prism for checking HOC / QOC

We have the accu-gauge product purchased through Eastern Turf .  I like to use it to check QOC ( quality of cut ) If you have a machine leaving lines or doesn't quit look flat then I can check the cut with this tool To see if an adjustment is need or if reels need to be reground . Also good for getting 2 different machines set up for a similar cut . At least it will give you a good starting point .


 Comes in a nice protective box .
 It's a triangle piece of glass with HOC lines marked on one side .
 You lay it flat on the turf and tip it toward you to see the HOC . If you want to check QOC you can tip it a little bit more towards you .
 You can get them with finer lines but I can tell we are in the .120 to .130 range by looking at theses lines . The QOC looks really good to . Very few stragglers .( grass that was missed in the  cut )


Over all pretty easy to use . It's a good tool for trouble shooting cuts .

Friday, July 20, 2012

Marking HOC on Machines


Learned something new the other day . About a month ago I was checking cuts ( mostly for stragglers missed ) with the prism and noticed that we are cutting below the bench HOC on most machines .I know there is a difference from bench set and actual .  I pointed it out but must have been overlooked due to the daily rigors at the course . Now recently the greens are getting a little stress due to hot couple of weeks we are having and I was approached to set the HOC ( height of cut ) up a little to help with the situation . I politely reminded the superintendent that we were cutting quite a bit lower than the bench HOC and I had checked them this morning with the prism . We learned a little bit about why there was such a difference in HOC ." I explained that I deal in bench setting with the numbers given to me" . If you add on grooved front rollers and the weight of the cutting unit plus lift/ lower arms and hydraulics, tire pressure,make and model, type of grass and maintenance practices  then the actual HOC can be as much as .010 to .025 . A big difference when your cutting at .125 on greens . So to make things easier I'm starting to mark both HOC's .The super will still tell me the actual HOC and now I will figure out the difference and adjust accordingly so we are on the same page . It's good to have a full understanding between the mechanic and superintendent  at these shorter HOC.
  
Our 3150Q cuts .010 lower than bench and the flex 21's I have to set up  .015 more to get the same HOC .
Triplex  .135 bench to get actual .125 and matching to flex 21  =.140 bench gets me .125  at this course ...... it most likely will be different at other courses .


A few of our machines .
         Notice how similar they look . Not hard for an operator to grab the wrong machine and start cutting if it's not labeled . I have marked them for many years the only thing I changed is marking bench set and actual HOC on greens mowers  for Superintendent so that we both know that we're on the same page .
We have never had a situation where the wrong machine has been used since doing it this way .
  
Prism ? yes when I get a chance I'll post one on the site .

PS. If anyone has a little extra rain that their not using please send it over  . Thanks .

Wednesday, July 18, 2012

1999 Cushman master cylinder replacement .


Our Gardeners truckster had lost it brakes . Usually it's a leaking wheel cylinder . After topping up the brake fluid and pumping the brakes I couldn't see any leaks . I did notice the master cylinder leaking a little and figured it was by passing fluid internally . Over all a pretty easy job . Biggest part was bleeding the brakes afterwards .


 Master cylinder is in a easy location to the right of the steering wheel . The reservoir is in a remote location under the engine bonnet .
 Surprisingly it wasn't to expensive for the new part and was in stock at out dealer at Eastern Turf .
 I started of by draining the reservoir by removing the rubber hoses on top of the master cylinder , then I loosened the lines with a flare nut wrench . The pick above shows to loosen the nut off the bolt , If you try to take the bolt side off you may wind up stripping the head . Remove the plate that locks the brake pedal shaft in place .
 I just used a pair of vise grips and turned it as your pulling it out . Hopefully it's not seized . Once the pedal is out of the way you can remove the 2 bolts holding the part on the brake pedal plate .  
 The pedal should pull out of the master cylinder and drop out .
 Just finishing removing the 2 brake lines .
I see this may not be the first time it has been changed . 2 different bolts holding the part in .  

 On installation I hooked the rubber hose up first and then the brake lines . It is easier to do it this way before you mount the new part in place . Gives you a little more wiggle room to get the lines threaded on .

 I also cleaned up and put never seize on the shaft that holds the pedal in place . Before you start bleeding the brakes top up brake reservoir . Always bleed brakes from the wheel cylinder that is the furthest away from the master cylinder . In this case Right rear .. left rear...right front ...left front .Work your way around till the air is all out . You may need a helper for this or you can put a line on the bleeder screw into a small jar partially filled with brake fluid and then you can open the line and pump brakes till the air is all out . Bear in mind that you will have to keep an eye on reservoir level and keep it topped up .


Here is a pick of how the pedal shaft is locked in place .