Friday, March 18, 2016

Fairway dew drag Update


Just an update on the rig I made for The Links at Brunello . 
Actually it worked better than expected .Other than a few bends and some modification for improvements it held up all season . To day I'm bringing the dew drag in for more upgrades . After personally using it a few times some I noticed a few areas for improvement . 


Looks pretty much like the day it was built . 


By using the square stock and spacing it with bolts you can get enough flex to straighten it out . Worked really well . 


The straight one had more of a bend than the one showed . 


 During the season some of the staff had a little problem pinning the arms after use . They were down low and a little cumbersome to use if your not mechanically inclined . 


To solve this issue I'm welding in some angle uprights and using a rod for support at the top . The rod placement will be padded to ride against the tailgate . The old design had ears that pinched the arms in place but I found some damage to the dump bed . This way it can rock back and forth not harming anything . 


Cut the lower sections not needed to replace with upright angle iron . 


Reattaching the arms . Simple ... just a bolt .


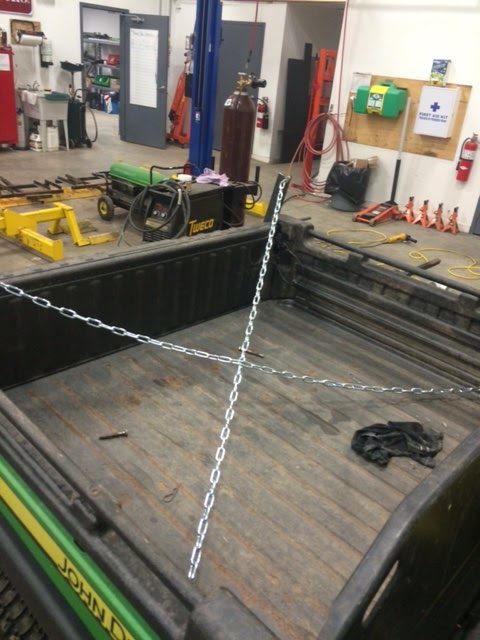
I'm adding cross chains to front of bed to help with rocking when transporting . 
Quick attach with clips on the box side . 


Reattaching rope in the same fashion . Worked great with the end caps that deflected arms up without damaging turf . 


Arm latch pins moved to this location  . Makes it easier to attach standing up .  


Just paint left and done . 
Springs just around the course . Course is looking great . 


Monday, March 14, 2016

Painting tines


Recently  I seen a post on Twitter about painting tines . Great idea . Won't be long as spring will be here and we will be going out in full forces . 
Painting our tines as they come in now . The idea is to make them easier to find when they loosen off and fall out. Might save a mower from accidentally hitting one out in the field . 


Started off painting them like this but


using Styrofoam made more sense to me and sped up the process . 
I'll add some pictures later when they get on the machines . 
One more tip the guys had on Twitter was to wrap a few turns of Teflon tape on the mount end to make them easier to remove . 
Everyone's starting to excited for our up coming 2nd season . 


The 864 ready to roll .


Not long now . Springs just around the corner . 


Wednesday, February 3, 2016

Mobile Reel Rack

Today I'm making some reel racks . I learn from my past design not to go to high ,you want to be able to muscle the top one on easily .   


Measured and cut out all the metal needed to make them . Using 1.5 " square tube stock mostly and some 1' angle iron . 


Testing to see How it looks and fits . Was a little to high and had to change things around a bit . 


Lining everything up like this made for quick work . Weld the bars in place .


On the top section ,place a piece of angle under ( 16" apart )


On the bottom weld another piece of angle like this . It will give just enough tip to keep it upright and not tip over holding reels in place . 


Ah much better . Chris and one of the guys asked if there is going to be wheels on them ? 

   
My original plan was just storage 


But after looking at the Dolly I'm thinking they were right . 


Test fitting before priming and paint .


Wheels will go on later to make them mobile . Makes sense , it will save me a few trips back and forth for sure .  


Getting the primer on 
I'll post the finish product later . 


Lucked out on some cheap wheels at hardware store . Cutting out mounts for wheels .


Weld them in place


Finished priming and painting .


Used grade 8 shank bolts for and axle .


A few more pictures


Going to weld in a spacer later so bottom reel doesn't rub on wheel .


Easy to move around


Takes up a lot less space .


Thursday, January 28, 2016

Large area Mower head protection screens

A bit of a challenge to build on Roll Over Protection (ROP) On our 7500 fairway units and 8800 rough units. I had put on screening for a quick fix last season. To be able to service the engine it will have to swing it up out of the way to get access. Also, most staff around 6' will put the seat fully back. So attaching between the ROP wouldn't work.  


Don't weld or drill into the ROP. Using these U bolts works well to attach the new screen. 


Measured and cut 1" angle and lined it with 1/2" screen.


Then measured across top mounts and drill out holes for top piece of angle iron. Picked up hinges at a hardware store to weld on so it can swing. Getting access to radiator cleaning is very important. Their blown out after every mow to prevent overheating . 


Lawsons primer


and paint are great products. 


 Hardware for bottom section all painted and ready for assembly. 


Using tri pods for paint stands to speed things up. 5 to make and 2 more for the triplexes. 

The bottom brackets will swing in towards seat if needed. Now the guys won't have to look back while mowing speeding things up a bit. 


Started the triplexes today. With the forward sweeping ROP some changes had to be made to make the screen work and still protect the operator's head.


The hardware store is under renovation, so I made clamps. Worked out really well. 


Using a piece angle across the top and a level to get the brackets on in the right spot. 


welding up the screen frames.


Clamping brackets on for welding .


Only will take a minute to take them off to weld .  


Had to add extra for head protection . Cuts in to clear inside of ROP when tipped forward for service .


Cut out and weld on screen.


On the paint rack primed and waiting for paint. 

All painted and ready to assemble. I'm using 3/8 short shank bolts to make screen swing up 


Same lower mount bracket as the bigger units. Bottom bars can fold out of the way for service if needed. 


A few more pictures. Paint matched pretty good after it dried. 


. Nice little mowers .


The sprayer was an easy one because of ROPs position . 


wrapped and tac welded a piece of 3/8 rod on screen and zip tied on. 


Had a set of LED lights left for extra lighting to the rear of machine. Turned out great