Wednesday, January 29, 2014

Down Time (cleaning my Foley bedknife grinder)

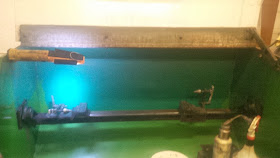
I have the pro - Gator in and waiting on parts . My reel mowers are all done so this is a good time to clean up one of my grinders and get it ready for the up coming season . I had a couple of ideas for it this season .


The left side bedknife holder I find is so far over that I'm jamming my fingers quite often when install bedknives and getting the holder screwed in place . 
Here it is all changed over . The adjuster was almost touching the side before.


I removed the holder . Measure it first so it can be installed out in the right place . The stationary side was moved over to the right 2.5 " . Drill a 13/64 th hole and tap for a 1/4 20 - thread.


put the holder on and measure to square up the other side and do the same . 


I measured from the back 3.125". 


We don't have any large size bedknives like you see on tow behind Ganges or National reels. If for some reason I need to put it back it won't be a problem . I'm protecting the old mount threads with set screws and never seize .  


I shouldn't have a problem getting my hands in there now . 


Most bedknives I have  are 21" + -. Plenty of room . 


I cleaned up the base section and repainted it again . I have not used the pump in the factory location ( pic below) in years . Every year I dump my version out and install a new one . Lasts the whole season and I won't fill it till we're ready to use it this summer . Every one has a cleaning bucket or hydraulic container around the shop to use if you want to move the location . I had run a hose from the drain plug  a few years back . The 5 gallon bucket was perfect . Nip the corners of the pump plate and I used a piece of 4 " irrigation pipe and a brick for the pump to sit on . The best part is any grindings go to the bottom of the bucket plus you don't have water sitting in the tray usually dripping on the floor the whole time your not using the grinder . 


The original pump location.


There was some sheet metal in the shop . So I made up a cover for it . 


The grinder does have an angle gauge . But ( below pic) I have used an angle finder for years on the inside .Works great . 


Parts just came in for Pro -Gator . So I'll be tackling the spin grinder later .

Friday, January 24, 2014

Pro - Gator 2020 wiring revisit

The Old Cushmans done . The gardener will be happy to have it for another year . 
Primarily used for top dressing .... our Toro HDX D had barely any hours , oil change and greasing .I checked the service book and marked all the next change service intervals on filters etc. Rear tires are having a problem leaking around the rims I'm going to reset the bead using bead sealer and will see what happens in the spring.   The  Toro Pro - Pass 200 wireless took a little bump and I straighten out the top plate of the spinner . Only 73 hours and the paddles are showing some wear . Top dresser just needed some grease and a check over .  Backing the belt scrapper off so when the unit was raised up for service will get the rest of the trapped sand out . 
Our John Deere Pro - Gator is in for service . It was used a fair amount in the fall and had very few issues . In the past it was a nightmare to keep running on a consistent basis . Doing the repairs on the wiring seems to be the key.
 Worked great most of the time but still getting some random issues .


This winter service I'll be fixing this issue for the last time " hopefully " Recently we purchased a good quality soldering gun .


The butt connectors and wraps were still allowing water or moister in . After a few seasons I'm back to this area for repairs . I'll be removing all the connections and past repairs and soldering the wires together for a  permanent fix .


Splitting the wires and twisting each piece together then


wrapping it back around the wire .


Soldering them together takes very little time with a good quality soldering gun . It helps to melt a little solder on the tip of the gun . Rosin core soldering wire is for electrical work .


 Also using liquid electrical tape . Apply wait ten minutes then re-apply . That should give 100% water proofing.


Then wrapped in 2 directions with electrical tape . Stretch the tape a little when you wrap wires it will  help bind  better .


After .... split loomed and secured wires to a non moving part of the machine .


All done . Now for the last step . I tend to hang on some old items if I think I can recycle it later .


An old GK IV grass basket . Perfect to make a splash guard to fix the real problem . 


A few zip ties . View from the outside . Right front tire kicks up mud , water , snow on to this area . This should solve it for the last time .


View from the inside . Simple and easy . Wished I had thought of it ten years ago .


You can see on the fuel tank how much mud gets kicked up . You can also see that the battery was moved to this better location for ease of service . The Pro Gator also had an instrument panel issue . Sometimes it worked and some times it was off . Removing the front clip I was able to pull the harnesses on the dash instrument panel . Cleaned connections with no luck ...You will have to lightly push the prongs on dash panel end to the outside and reconnect the harnesses to get a trouble free contact . The above repairs should make this heavy hauler a daily driver again . Waiting on a few parts . Then back to the Newer Cushman .

Sometimes you have to stop and think of how to solve an issue that takes you away from your daily routine .

A down non starting or running machine can eat up a good part of your day .

 This machine alone has robbed many hours of my time over what I see as a design flaw from day one .

After a while you will get to know your machines and there quirks to solve issues in a timely manner .


More and more modern day machines of all makes and colors are better designed for easy service and longer trouble free use as long as they are maintained properly .


Friday, January 17, 2014

Last big area Mower Toro 4300D deck bushings etc.

Down to the last rough mower and the end of our mowing equipment . Next up maintenance carts , sprayers  , top dresser , tractors then small engines . 


The decks look pretty messy but the waxed decks will speed up the clean up . After the irrigation is shut down it is hard to get the machines clean .  I noticed the decks tilted a little more than the newer model .


I have planned to replace the bushings in the pull frame on this unit . Only takes a few seconds to remove the pins to get the draw bar off . 


I found the best way for me to get the old bushings out is to use this type of chisel .


Once your good at it it only takes a few seconds to cut a section out . They pretty much fall out afterwards .


If not I use this large punch 


And tap them out .


It was worn quit a bit . You want to replace theses before it becomes metal on metal .


Made good use of my press . So much easier doing it this way . 


I really liked the fact that the pin could be rotated 180 degrees and holes were there and threaded . These decks are pretty heavy and the pins will bend a bit over time running on rough terrain with the decks up . I can remember on the old gear (Old  technology ) having to weld in flat /grooved in spots and grind down to fit . 


The ceiling hoist made it easy to lift the deck


onto my roll top .


I place putty knifes under the rollers so the decks won't accidentally roll off on me . They are very heavy and could break your foot or leg if your not careful.


Also giving the body panels a good waxing . Especially the rough units were they tend to cut along the tree line here. Hides the scratches and helps prevent them to some extent .  


Not bad for 2008 / 1400 hrs. 


During the mowing seasons I try to remember annoying issues . The rough units do a lot turns with decks down . I found that the outside front deck rear roller seals keep backing off .   
My little pet peeve project . I'm removing the rear roller 


Setting it up in the vice lightly to remove the end brackets . .


The guards are taking a beating . I'm going to flip the sides so it will wear on the other side now . Saves on buying parts for now . 


All the parts came of easily.


The seal bushing . You can see the wear from debris getting in . Last season I replaced a damaged roller tube on one of these , The rollers have 2 seals on the ends .Using Swepco 103 every time they come off the wash rack and these seals the roller will never seem to wear out . They still feel almost new when you roll them . The bushings were re-installed with the red loc-tight . Hopefully that will hold them in.


The grease nipple lines up with the hole in the shaft . Some techs have had problems with the shaft spinning inside the bracket and opted out to removing the Allan head screws on the ends of the shaft and installing grease nipples there instead . 


On assembly line up the flat spot or punch mark with grease nipple then tighten this side up . Once it's assembled back on deck you can just tighten the other side up . 


A shiny bunch of New looking old gear . I get a kick when the staff tell me that a member approached them asking how the new gear is working .... They are starting to show their age if you look close.  


They are packed in pretty tight so we can keep all the gear inside for the winter. I always keep the reels down .