It seems for some reason this machine spends a lot of time not needing an engine to get around . It has been a troubled machine since new . I inherited from the sister course a few years back .
First day out of the shop and it blew a head gasket . The boys where not impressed and had to shovel the traps up by hand . Personally shovelling our traps by hand does a better job anyway .
The engine is in a pretty tight place and is much easier to remove from machine to repair . I'm not going to talk to much about the repair . I will talk about the importance to take key picture for reassembly . When doing a small engine their can be many parts that need to go back in the same location . Looks easy when tearing apart but when it comes to reassembly you can get confused easily . The reassembly instructions give the basics but not much in fine details .
Here Is a picture of the starter side wiring . Doesn't hurt to label or right down what colors go where .
Picture of choke linkage.
Throttle linkage.
Ground wires and where they bolt on the machine .
Oil pressure switch .
Rear framing section that hold the hydraulic pump to the engine ...pulleys on engine and pump will have to be removed first .
Along with the rake lift framing and park brake assembly.
I left the starter positive wire to solinoid and ground cable to battery on engine .
Engines out and on the bench .
I took it over to the parts washer and cleaned it of as well a possible then blew it off with air .
Pic of bracket on top of engine and carburator .
Another picture of choke linkage and ground wire ...which I found the bolt was cross threaded .
Fuel pump and brackets pictures . When I was reassembling, this part left me scratching my head till I referrenced the pictures I took .
Removed the flywheel . The guys on the tech site suggested to replace the front and rear crankseals while it was out . The rear seal on this one had a slight leak before I pulled it out .
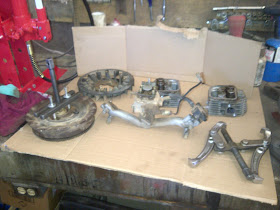
All the shields need to be removed . I also laid the parts and bolts to each part together on a couple of pieces of cardboard . That way I could right notes on it and if a parts drop by mistake you can easiely find it .
Pictures of how the wiring was tied up to the intake manifold . Kill switch wires to shield .
See the black wire coming through the shield ! remember it because it is the fuel shut off solinoid that was fed down from the top of the engine to here behind the shields .
The most important pictures of all are the governor linkages and springs etc. and where they go .
With out pictures you could spend days trying to figure out where the springs go unless you have the full service manual .
Linkage to carburator the small spring ( 4 pic's up )hooks on the next hole also this end will have to be attached before assembling all the brackets . There is no other way to get it on the carburator end otherwise .
Picture of shield on top of engine and below the clip that attaches to the bottom to hold the wire off the flywheel .
The flywheel pulled off fairly easy . Leave the nut on loose till it pops off plus it will prevent the end from getting damaged .
Keep the rocker arms and push-rods matched and lay them out on the cardboard . You can label them . If you forget the aluminum push-rods are the exhaust .
4 bolts to remove the head on each side . I like to crack each one first before pulling them all out .
Not hard to tell the intake side from the exhaust . The exhaust valves do not have valve seals plus running a dirty air filter caused it to run rich resulting in this look on the piston . Also the plugs were black and clumpy and they looked like they were running with the choke on . (which was not the case )
A few more pic's of parts laid out . I'll go back and clean everything up before the seal kit gets here .
Heads are all cleaned up and ready . I use medium grit emery cloth on a hard flat surface circling it in a figure eight pattern . I also replace the intake valve seals .
Also replaced the rear cover seal .
Over all it took the better part of a day to reassemble torque bolts to specs, check coil to flywheel air gap and valve clearances . New filters, plugs , oil etc . reinstalled and hook up .
Being a golf course equipment mechanic you are working on many different types of equipment some times there are a few in the shop torn down waiting for parts . If you do the above you can reassembly them quickly with out to much guess work or trouble . In my case this unit sat in the way for almost 2 weeks . I had to check a few key pictures to remember where things went . The best part was it fired right up when the fuel hit the carb . Makes for a great day .
Our New fuel tanks have arrived and wiring upgrades to the buildings are finished . Now I can go back and finish off 2 snippers and start getting into cut checking routine . All the the gears been out a few times and no problems so far . The MD's are going to get the hitch upgrade soon too .


